About Me

My photo
Washington , United States
I officially became a "Baker" on October 10, 1987. When my husband and I were engaged we joked that he was Baker and I was Asst. Baker (we even had sweatshirts made) During the 23 years that I was raising children, it didn't leave much time for baking, but I have always enjoyed it when I do find the time. My love of making cheesecakes and a friend posting a cake he really wanted started me on my Bake(r)ing journey about 3 years ago. Life is still crazy busy, but I find that baking brings such joy that it also brings peace & calm to a busy life, and heck...who doesn't love a good cheesecake?

Monday, December 24, 2012

Cranberry Orange Cheesecake


While standing in line at the supermarket a couple years ago, I noticed a beautiful picture of a cheesecake on the cover of Cooking Light.  Picking up the magazine to find the recipe inside, one glance and I knew that it would never work.  Who wants a “Light” Cheesecake?  Not I!  J   I bought the magazine anyway, because the recipe did have one component that I wanted to use.  Taking the idea, I knew I already had the perfect cheesecake recipe (Martha Stewart’s Classic Cheesecake Recipe) that I could use and incorporate the cranberry swirl.   Doing so, I made up my very first cheesecake recipe.

“Cheesecake Night” – a night I schedule in advance, for which I make an abundance of cheesecakes and hopefully invite enough friends over to try them all, without leaving any leftovers-- was last Friday night, and out of the four cheesecakes there that night, this one was voted everyone’s favorite.  I think because it does indeed have a true slightly sweet flavor of an original cheesecake, yet is a bit tangy because of the cranberries.

Just in time for Christmas, literally.    ~Enjoy and Merry Christmas!!

Crust:
1 ½ cups Oreo crumbs
¼ cup butter, melted

Cheesecake:    
Adapted from Martha Stewart’s recipe above; omitting the crust and halving the recipe
1 ¼ pounds cream cheese (20 oz.) room temperature
¾ cup sugar
½ tsp. finely-grated lemon zest, plus ½ TBS fresh lemon juice
¼ tsp. coarse salt
2 large eggs
½ cup sour cream
Optional: 1 tsp. powdered vanilla (my secret ingredient)

Cranberry Swirl
1 ½ cups fresh cranberries
½ cup sugar
¼ cup Orange Liqueur (Patron Citronge)
3 TBS water

Preheat oven to 325. Set a kettle of water to boil.  Place a 9-inch springform pan on a double thickness of heavy-duty foil.  Securely wrap foil around pan.  Grease pan and set aside.
In a food processor, pulse Oreos (about 20) until you have the needed 1 ½ cups fine cookie crumbs.  Combine cookie crumbs and butter and press into the bottom of the springform pan.

Using an electric mixer, beat cream cheese on medium until fluffy, scraping down sides of bowl.  Gradually add sugar, beating until fluffy.  Beat in lemon zest, juice, salt, and vanilla (if using).  Beat in eggs, one at a time, scraping down sides of bowl after each addition.  Beat in sour cream.  Pour over prepared crust.

Place cranberries, sugar, liqueur, and water in a saucepan; boil.  Cook 8 minutes or until cranberries pop and mixtures is syrupy.  Cool 20 minutes.  Place mixture in a food processor; process 1 minute or until smooth.   Spoon about 6 dollops of cranberry sauce on top of cheesecake.  You can use as much or as little of the sauce as you wish.  I typically use about ¾ of the amount.  Swirl together using the tip of a knife.  Again, you can swirl as much or as little as you wish to get the look you desire.

Place springform pan in a roasting pan and add about an inch of the boiling water.  Bake until center is just set, about 45-50 minutes.  Remove pan from water; let cool 20 minutes.  Run a knife around edge; let cool completely.  Chill overnight.

~Enjoy

Sunday, November 18, 2012

War Cake


My friend Margaret has been on the search for THE perfect chocolate cake.  It got me thinking about cakes I have made in the past and I think I quite possibly have the best chocolate cake recipe already.

Again, this recipe comes from the five years we lived in Alturas, California.  It was given to me by my friend Lori.  I had never heard of a War Cake before, although I had never really had a reason to think about it.  The cake recipe itself uses no eggs, butter, or milk and originates from the WWII era when those items were rationed, hence the name: War Cake

This cake is so quick and easy and only uses one bowl.  I don’t even use a mixer.   You will want to just stir it gently by hand until all ingredients are well blended, as over-beating can make it a bit “tough”.

Incredibly rich and moist and sure to satisfy even the most intense chocolate craving. Make sure you have a big glass of milk standing by!

And this close to Thanksgiving, I am ever thankful that today we don’t have to worry about food rations.

 ~Enjoy!

War Cake

1 ½ C. flour
1 C. sugar
1 tsp. baking soda
½ tsp. salt
3 Tbs. cocoa

Stir dry ingredients together.

Add:  6 Tbs. oil
         1 tsp. vanilla
         1 Tbs. vinegar
1 C. water

Add liquid ingredients to the bowl of dry ingredients all at once and mix by hand just until blended.

Bake in a greased 8x8” pan at 350 for 35 minutes. 

This recipe easily doubles; bake in a 9x11” pan if doubling.

Frosting:  (if you wish)
½ C. butter- soft
2 C. powdered sugar          
2 Tbs. cocoa
1 tsp. vanilla
4 Tbs. ½ & ½ 


Tuesday, November 13, 2012

A Recipe Can Take Me Back


They say a song can take you back. For me, so can a recipe.  I can still remember (and yes, this was about 35 years ago) many of the sights, smells and sounds of a Vacation Bible School I attended as a child at my favorite church ever, the church I attended with my Grandpa and Grandma.  I would sit on my Grandma’s lap looking at all the stones in her mother’s ring, but that is a story for another time.  At Vacation Bible School that year we made one of those nifty recipe holders that you make by putting plaster in a hairspray can lid and sticking a fork in the middle of the plaster to hold your recipe. 

The memory of this recipe also takes me back to my mother’s kitchen when I was a young teenager, tearing her recipe box, books, and the cupboard she kept them in apart, looking for the recipe from Vacation Bible School that we seemed to have lost along the years.  Mind you, this was before we all had computers and Google.  Back then you didn't just hop on over to the internet and search for the recipe; you had to accept the fact that you had lost it. 

Now jump to Alturas California.  We lived there for five years and had the most amazing friends and church family.  We had a tradition in our church when families moved away to make them a scrapbook.  We would each take one page of the scrapbook and include a photo of our family; memories of times spent with them, and of course, a recipe or two.   On one of the occasions when a family was moving away, and we were all working on our scrapbook pages for them, I received a phone call from a friend asking if I would be able to help her make her page.  Of course I said yes, and soon we were sitting at my kitchen counter with all my scrapbook papers, stickers, and rubber stamps scattered around us working on her page.  When she showed me her recipe that she brought to include on her page, I just started to cry and jump up and down shrieking with excitement.  There in my hands was the recipe from Vacation Bible School that I had lost so, so many years before.  Thank you, Kelly Larsen, for reuniting me with my long-lost recipe!

Now you may laugh when you see this recipe.  The easiest, simplest, no-bake recipe you have ever seen!  So maybe this recipe is more about the story and the memories than the recipe itself.  And I am quite sure the story behind it is why I got a bit miffed when an acquaintance once asked me for the recipe and then days later posted it on Facebook as her own!  So I give this to all of you today….just remember where it came from!   Please!

~Enjoy


Peanut Butter Balls

1 c. peanut butter
¼ c. honey
½ c. powdered milk
1 c. instant oatmeal
½ c. tiny chocolate chips
        sesame seeds

Mix all ingredients except sesame seeds.  Form into small balls & roll in sesame seeds. Refrigerate until firm (about 2 hours)  I always double the recipe.  We are a divided family, my son doesn't like sesame seeds, so I always make 1/2 with and 1/2 without. 

Currently, this is the only picture I have. Every year  my dear friend Margaret helps me make 12, yes I said 12 batches of these for the 30 Robotics students I need to keep fed during a three day Robotics event.  

Sunday, November 11, 2012

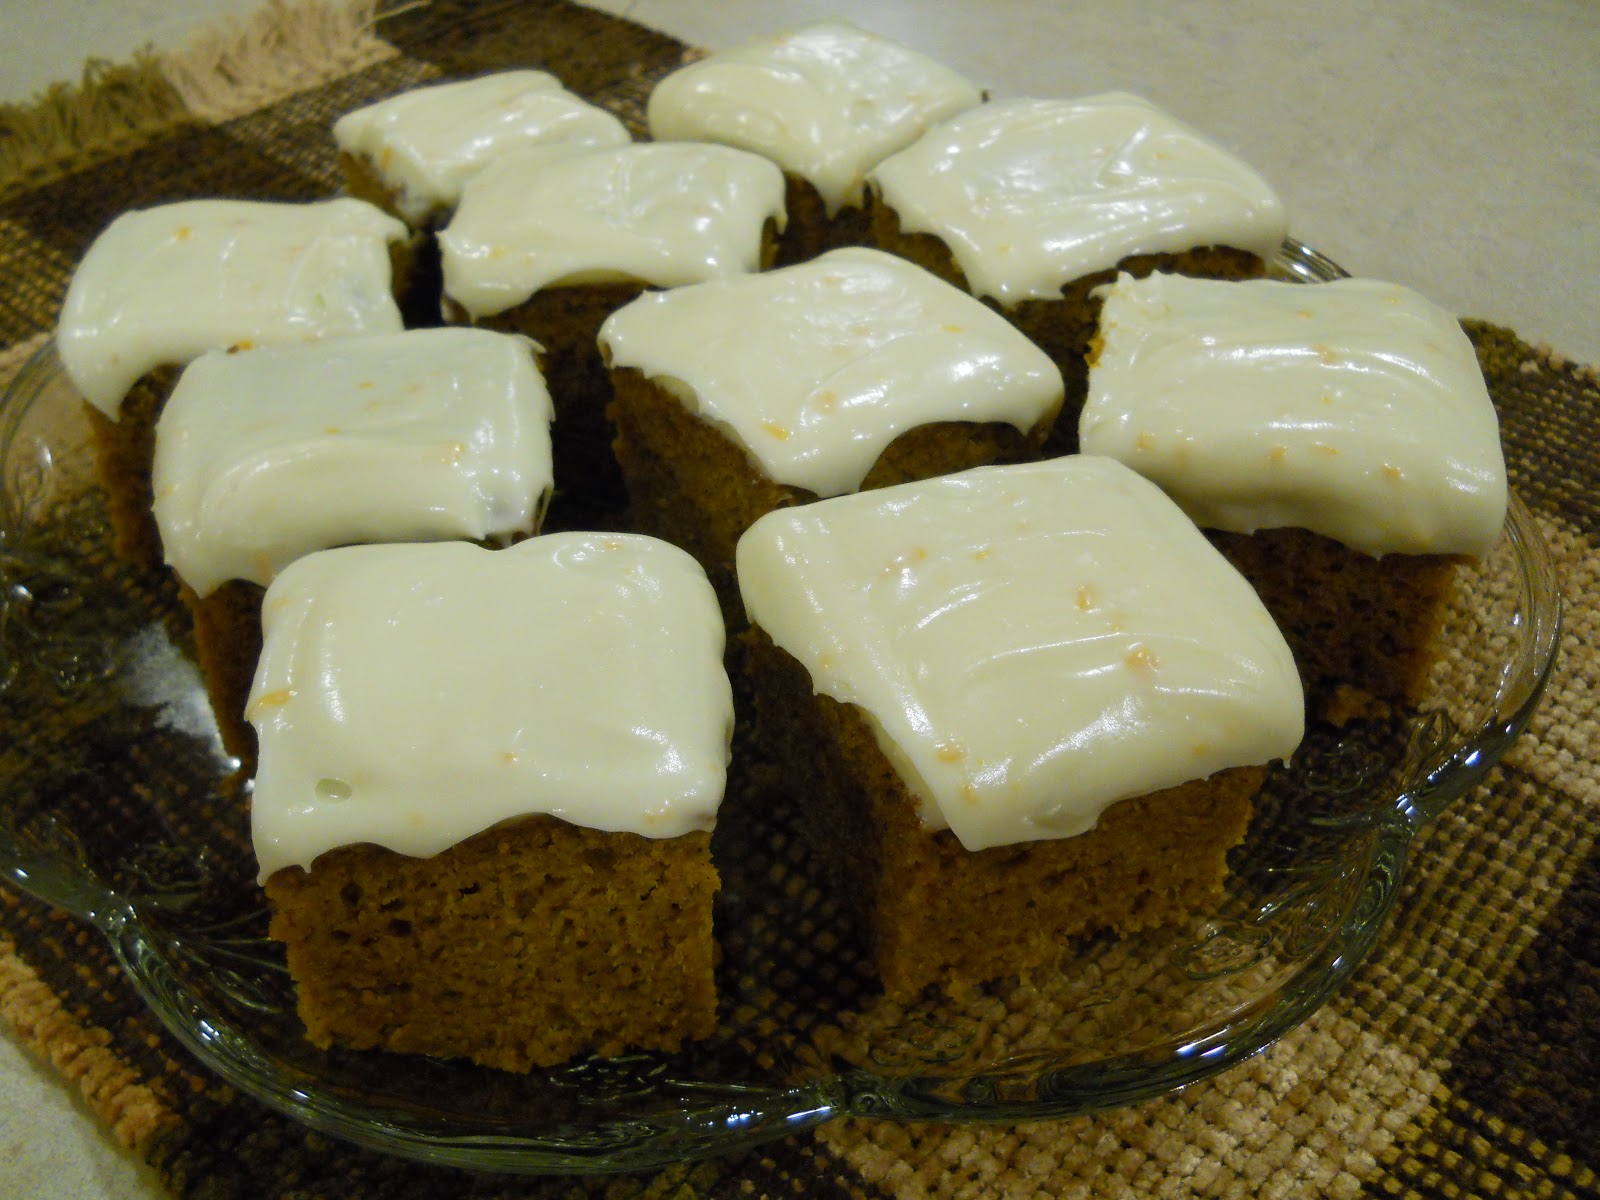
Sharon Bennett's Pumpkin Bars


Do you ever call a recipe by the name of the person that you received it from?  I do.  Betty Brewer's Cream Cheese Foldovers, Margaret Smith's Biscotti, Shawn Miklautsch’s  Raspberry Shortbread Cookies, Ellen Jones's Chocolate Chip Cookies, Mom’s Marriage Meatballs and today's recipe, Sharon Bennett's Pumpkin Bars.  So many recipes are special to me because of the people I got them from.  Calling the recipe by their name is just my little way of remembering them and their friendship as I bake.  I also don't actually consider the recipe "mine", while I may have acquired it years ago; I still consider it theirs and like to give them the credit for it.

Sharon was a woman whose home I cleaned for about four years.  I love the people I clean for, I couldn't do it otherwise.  I end up knowing about their children, their grandchildren, likes, dislikes and about their lives.  Sharon passed away last year and I miss my visits with her but enjoyed thinking about her today as I baked these pumpkin bars.

A quick and easy recipe, and one of the few things I bake that I have a terrible time not going back for more and more and more.  They will be so good with coffee in the morning!!  So make with caution, but as always…   ~Enjoy


Sharon Bennett’s Pumpkin Bars

4 eggs
2 cups sugar
¾ cup vegetable oil
1- 15 oz. can pumpkin
2 cups flour
2 tsp. cinnamon
¾ tsp. EACH- ginger, cloves, nutmeg, salt
2 tsp. baking powder
1 tsp. baking soda

Beat eggs; add oil, sugar and pumpkin.  Combine flour, spices, baking powder & soda.  Mix into pumpkin mixture.  Pour into a greased & floured 10” x 15” pan (I use a 9” x 13” glass Pyrex)  Bake at 350 for 35 minutes.   Let cool before frosting.

Orange Cream Cheese Frosting

1- 8 oz. pkg cream cheese
2 TBS butter
1 ½ tsp. milk (or ½ & ½)
½ tsp. vanilla (of course I double that!)
¾ tsp. orange zest
Powdered sugar (about 2 cups)

Beat all ingredients together adding powdered sugar until the frosting in the consistency that you like. 

Frost pumpkin bars and enjoy!  

Saturday, November 10, 2012

The Beginning- Strawberry Rhubarb Pie

I decided if I was going to start a blog about baking, it had to start with where baking started for me.

I hadn't known my husband very long before I knew his favorite pie is Strawberry Rhubarb.  Well that’s great; I had never made a pie in my life.  This was not something I jumped right into. We had been married about 5 years before I ever attempted to make one for him.  We lived in Alturas, California at the time.  Have you ever lived in the middle of nowhere? It makes you feel like a brave pioneer that can do anything, so I set my mind to learning how to make a pie.  My friend Ellen was very “domestic” so I asked her for some tips.  Turns out her mother used to make pies and sell them, so I figured this was going to be some good advice!! Her main tips were: use the coldest and least amount of water possible while making your pie crust. Don’t over handle the crust. Use a fork to make A LOT of holes in the crust. Use more flour than the recipe calls for so the flour/sugar mixture is thicker. Put a layer of your flour/sugar mixture on the bottom to keep your crust from getting soggy.   So with that amount of information alone, I grabbed my Betty Crocker Cookbook that we had received as a wedding gift and got to work.

I can’t even begin to tell you how many times I have made this pie since that first time.  But I can tell you, after all these years; I still don’t have the recipe memorized.  When we were moving in 2007 and my cookbook was lost I cried and was heartbroken for days.  Then it occurred to me….eBay! I got busy looking and soon found the EXACT edition of my lost cookbook.  So to this day, I am still using the original recipe I started with. I hope you enjoy it as much as we do.


FRESH STRAWBERRY-RHUBARB PIE

Pastry for 9-inch Two-Crust Pie (recipe below)
1 1/3 cups sugar
1/3 cups flour (I use about 2/3 cup)
½ teaspoon grated orange peel (optional)
2 cups cut-up fresh rhubarb (1/2 inch pieces)
2 cups sliced fresh strawberries (I quarter mine)
2 tablespoons margarine or butter

STANDARD PASTRY  9-inch Two-Crust Pie

2/3 cup plus 2 tablespoons shortening
2 cups all-purpose flour
1 teaspoon salt
4-5 tablespoons COLD water (I typically use 3-4)

Cut shortening into flour and salt with a fork until particles are size of small peas.  Sprinkle in water, 1 tablespoon at a time, tossing with fork until flour is moistened and pastry almost cleans side of bowl. 

Gather pastry into a ball (without overworking); shape one half into a flattened round on lightly floured board or pastry mat. Roll pastry 2 inches larger than inverted pie plate.  I use my pastry mat, lifting from one side, to gently roll pastry over the top of my rolling pin and then transfer bottom crust to pie plate. Put other half of crust in refrigerator until pie is assembled.  

Trim overhanging edge of pastry ½ inch from the rim of pie plate.  Prick bottom and sides thoroughly with a fork.

Mix the flour, sugar and orange peel together in a bowl.   Mix the strawberries and rhubarb together in another bowl. 

Pour about ½ cup of the flour/sugar mixture on the bottom of pie crust.  If you are using a pie bird, now is when to place it in the center of your pie. 

Turn half of the strawberries and rhubarb into the pie crust; sprinkle with half of the flour/sugar mixture. Repeat with remaining fruit and sugar mixture; dot with butter.  Roll out the top crust.  Top pie with top crust that has slits cut in it.  Trim overhanging edge of pasty 1 inch from pie plate; seal and flute. 

Cover pie crust edge with 2-3 inch strip of aluminum foil to prevent excessive browning; remove foil during the last 15 minutes of baking.  I place my pie plate on a cookie sheet for easy transferring to the oven and in case juice bubbles over.  Bake at 425 until crust is brown and juice begins to bubble through slits in crust, about 40-50 minutes.  (I always bake mine 50 minutes)

It’s easy to give your crust a blue-ribbon look. Take your choice- shiny, sugary or glazed. For a shiny top, brush the crust lightly with milk before baking.  For a sugary crust, use your fingers or a pastry brush to moisten crust lightly with water, and then sprinkle on a little sugar.  To glaze a crust, brush lightly with beaten egg (or egg yolk mixed with a little water) before baking.  I like “Shiny-Sugary” so I use milk and sugar to top mine.

You can make a Fresh Rhubarb Pie by using 4 cups of cut-up rhubarb and increasing sugar to 1 2/3 cups.

~Enjoy